VCDX Defence Essentials – Part 2 – Preparing for the Design Scenario

Following on from Part 1 – Preparing for the Design Defence, Part 2 covers my tips for the Design Scenario part of the VCDX defence.

After a short break following your 75min Design defence, your neck deep in the Design Scenario. You are presented with a scenario which you need to demonstrate your abilities to gather requirements and while you will not be able to complete a design in 30mins, you should be able to demonstrate the methodology you use to start the process.

As mentioned in Part 1, I am not a official panellist and I do not know how the scoring works. The below is my advice based on conducting mock panels, the success rate of candidates I have conducted mock panels with and my successfully achieving VCDX on the 1st attempt.

Common Mistakes

1. Not gathering and identifying requirements/constraints & risks

The design scenario is very high level, and does not provide you with all the information required to be able to properly start a design. Not identifying and clarifying requirements/constraints and risks will in most cases prevent a candidate from successfully being able to start the design process.

Note: The word “Start” is underlined! You can’t start a design without knowing what your designing for… so don’t make this mistake.

2. Not documenting the requirements/constraints & risks

Assuming you have not made Mistake #1, and you have gathered and clarified the requirements/constraints & risks, the next mistake is not to write them down. I have seen many candidates do an excellent job of gathering the information, to then fall in a heap because they waste time asking the same questions over again because the have forgotten the details.

30 mins is not a long time, you cannot afford to waste time repeating questions.

3. Going down a rabbit hole

I have observed many candidates who are clearly very knowledgeable, who have spent 10-15 mins talking about one topic, such as HA and going into admission control options and pros/cons, isolation response etc. They demonstrated lots of expertise, but this did not help getting as much progress as possible into a design within the time constraint.

The design may be excellent in one key area (eg: HA) but severely lacked in all other areas, which would certainly led to a low score in the design scenario.

4. Not adjusting to changes

The information given to you in the design scenario may not always be correct and may even change half way through the design. Just like in a customer meeting, the customer doesn’t always know the answers to your questions, and may give you an incorrect answer, or simply not know the answer, then later on, realise they gave you incorrect information and correct themselves.

I deliberately throw curve-balls into mock design scenarios and I have observed several times a candidate be say 25 mins into the design scenario and this happens, and they failed to adjust for whatever reason/s.

5. Being Mute!

I have seen candidates who stand starring at the whiteboard, or drawing away madly, while completely mute. Then after 5-10 mins of drawing/thinking candidates then talk about what they came up with.

Do you stand in customer meetings mute? No! (Well, you shouldn’t!)


Tips for the Design Scenario

1. Clarify the Requirements/Constraints

Start by clarifying the information that has been provided to you. The information provided may be contradictory, so get this sorted before going any further.

2. Write the requirements/constraints & risks on the Whiteboard

Once you have clarified a piece of information that has been provided to you, write it on the whiteboard under section heading, such as:

a) Requirements

b) Constraints

c) Risks

d) Assumptions

Now, you can quickly review these items, without having to remember everything and if a curve-ball is thrown at you, you can cross out the incorrect information and write down the correct info and this may assist you modifying your design to cater for the changed requirement/constraint etc.

As you work through the scenario, you may be able to clarify an assumption, so you can remove it as an assumption/risk, this shows your working towards a quality outcome.

3. Write down your decisions!

Ensure you address each of the key areas of a vSphere solution by writing on the whiteboard headings like the following:

a) Storage

b) Networking

c) Compute

d) Availability

e) Datacenter

Ensure you write down at least 3 items per section, so you are covering off the entire environment.

As you make a design choice, write it down, eg: under storage, you may be recommending or constrained to use iSCSI, so write it down. iSCSI / Block storage.

So, aim to have 5 section headings like the above examples, and at  least 3 items per heading by the end of 30 mins. If you do the math, that’s only 6 mins per section, or 2 mins per item so make them count.

eg: Availability does not just mean N+1 vSphere cluster, what about say, environmental items such as UPS? A successful VCDX level design is not just about vSphere.

4. Verbalize your thought process.

I cannot give you advise, if I don’t know what your thinking! Same with the panellists, they can’t score you if you don’t verbalize your thought process.

No matter what, keep thinking out loud, if your working through options in your mind, that’s what the panel want’s to hear, so let them hear it!

If you are mute for a large portion of the 30 mins, the lower the chances you have of increasing your score.

5. Show how you adjust to changes in requirements/constraints/assumptions!

As a VCDX candidate, your most likely an architect day to day, so you would have dealt with this many times in real life, so deal with it in the design scenario!

If your 25 mins into the design scenario, and the panel suddenly tells you the CIO went out drinking on the weekend with his new buddy at storage vendor X and decided to scrap the old vendors storage and go for another vendor, deal with it!

Talk about the implications of moving from vendor X to vendor Y, for example FC to NFS and how this would change the design and would it still meet the requirements or would it be a risk?

6. Don’t be afraid to draw diagrams – but don’t spend all day making it pretty!

Use the whiteboard to draw your solution as it develops, but don’t waste time drawing fancy diagrams. A square box with ESXi written in it, is a Host, it doesn’t need to be pretty.

eg: If your drawing a 16 node cluster, draw three squares, Labelled ESXi01, ESXi…. and ESXi16, don’t draw 16 boxes, this adds no value, wastes time, and makes the diagram harder to draw.


Summary

I hope the above tips help you prepare for the VCDX design scenario and best of luck with your VCDX journey. For those who are interested, you can read about My VCDX Journey.

In Part 3, I will go through Preparing for the Troubleshooting Scenario, and how to maximize your 15 mins.

Scale Out Shared Nothing Architecture Resiliency by Nutanix

At VMware vForum Sydney this week I presented “Taking vSphere to the next level with converged infrastructure”.

Firstly, I wanted to thank everyone who attended the session, it was a great turnout and during the Q&A there were a ton of great questions.

I got a lot of feedback at the session and when meeting people at vForum about how the Nutanix scale out shared nothing architecture tolerates failures.

I thought I would summarize this capability as I believe its quite impressive and should put everyone’s mind at ease when moving to this kind of architecture.

So lets take a look at a 5 node Nutanix cluster, and for this example, we have one running VM. The VM has all its data locally, represented by the “A” , “B” and “C” and this data is also distributed across the Nutanix cluster to provide data protection / resiliency etc.

Nutanix5NodeCluster

So, what happens when an ESXi host failure, which results in the Nutanix Controller VM (CVM) going offline and the storage which is locally connected to the Nutanix CVM being unavailable?

Firstly, VMware HA restarts the VM onto another ESXi host in the vSphere Cluster and it runs as normal, accessing data both locally where it is available (in this case, the “A” data is local) and remotely (if required) to get data “B” and “C”.

Nutanix5nodecluster1failed

Secondly, when data which is not local (in this example “B” and “C”) is accessed via other Nutanix CVMs in the cluster, it will be “localized” onto the host where the VM resides for faster future access.

It is importaint to note, if data which is not local is not accessed by the VM, it will remain remote, as there is no benefit in relocating it and this reduces the workload on the network and cluster.

The end result is the VM restarts the same as it would using traditional storage, then the Nutanix cluster “curator” detects if any data only has one copy, and replicates the required data throughout the cluster to ensure full resiliency.

The cluster will then look like a fully functioning 4 node cluster as show below.

5NodeCluster1FailedRebuild

The process of repairing the cluster from a failure is commonly incorrectly compared to a RAID pack rebuild. With a raid rebuild, a small number of disks, say 8, are under heavy load re striping data across a hot spare or a replacement drive. During this time the performance of everything on the RAID pack is significantly impacted.

With Nutanix, the data is distributed across the entire cluster, which even with a 5 node cluster will be at least 20 SATA drives, but with all data being written to SSD then sequentially offloaded to SATA.

The impact of this process is much less than a RAID rebuild as all Nutanix controllers in the cluster participate and take a portion of the workload as a result the impact per disk, per controller ,per node and importantly for production VMs running in the cluster, is greatly reduced.

Essentially, the larger the cluster, the faster the cluster can repair itself, and the lower the impact on production workloads.

Now lets talk about a subsequent ESXi host failure, now we have two failed nodes, and three surviving nodes, and only one copy of data “A” , “B” and “C” as shown below.

Nutanix5NodeCluster2failures1copydata

Now the Nutanix “Curator” detects only one copy of data “A”, “B” and “C” exists and starts to replicate copies of “A”, “B” and “C” across the cluster. This results in the below which is a fully functional and redundant cluster, capable of surviving yet another failure as shown below.

Nutanix5NodeCluster2Failures

Even in this scenario, where two ESXi hosts are lost, the environment still has 60% of its storage controllers (and performance), as compared to a typical traditional storage product where the loss of just two (2) controllers can have your environment completely offline, and even if you only lost a single controller, you would only have 50% of the storage controllers (and performance) available.

I think this really highlights what VMware and players like Google, Facebook & Twitter have been saying for a long time, scaling out not up, and shared nothing architecture is the way of the future. The only question is who will be dominant in bringing this technology to the mass market, and I think you know who I have my money on.

Scaling problems with traditional shared storage

At VMware vForum Sydney this week I presented “Taking vSphere to the next level with converged infrastructure”.

Firstly, I wanted to thank everyone who attended the session, it was a great turnout and during the Q&A there were a ton of great questions.

One part of the presentation I got a lot of feedback on was when I spoke about Performance and Scaling and how this is a major issue with traditional shared storage.

So for those who couldn’t attend the session, I decided to create this post.

So lets start with a traditional environment with two VMware ESXi hosts, connected via FC or IP to a Storage array. In this example the storage controllers have a combined capability of 100K IOPS.

50kIOPS

As we have two (2) ESXi hosts, if we divide the performance capabilities of the storage controllers between the two hosts we get 50K IOPS per node.

This is an example of what I have typically seen in customer sites, and day 1, and performance normally meets the customers requirements.

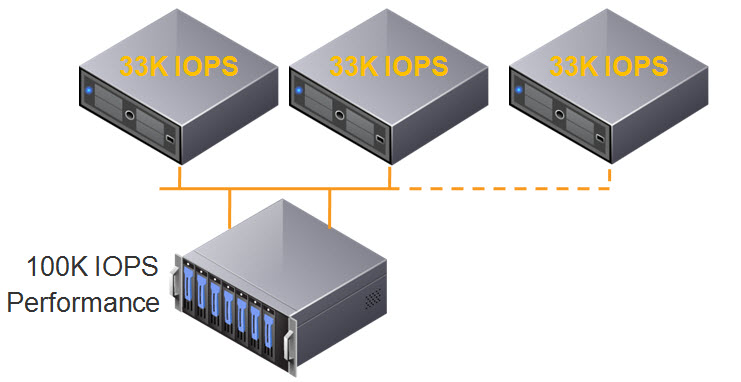
As environments tend to grow over time, the most common thing to expand is the compute layer, so the below shows what happens when a third ESXi host is added to the cluster, and connected to the SAN.

33KIOPS

The 100K IOPS is now divided by 3, and each ESXi host now has 33K IOPS.

This isn’t really what customers expect when they add additional servers to an environment, but in reality, the storage performance is further divided between ESXi hosts and results in less IOPS per host in the best case scenario. Worst case scenario is the additional workloads on the third host create contention, and each host may have even less IOPS available to it.

But wait, there’s more!

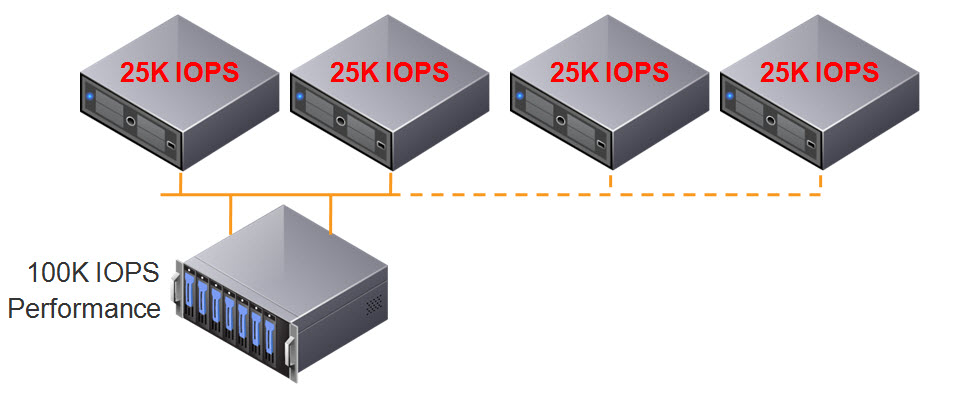
What happens when we add a forth host? We further reduce the storage performance per ESXi host to 25K IOPS as shown below, which is HALF the original performance.

25KIOPS

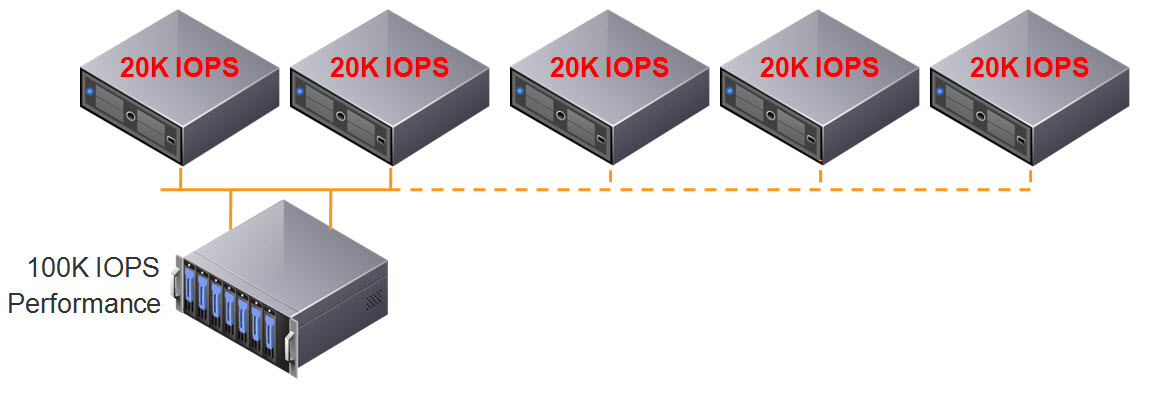
At this stage, the customers performance is generally significantly impacted, and there is no easy or cost effective resolution to the problem.

….. and when we add a fifth host? We continue to reduce the storage performance per ESXi host to 20K IOPS which is less than half its original performance.

20KIOPS

So at this stage, some of you may be thinking, “yeah yeah, but I would also scale my storage by adding disk shelves.”

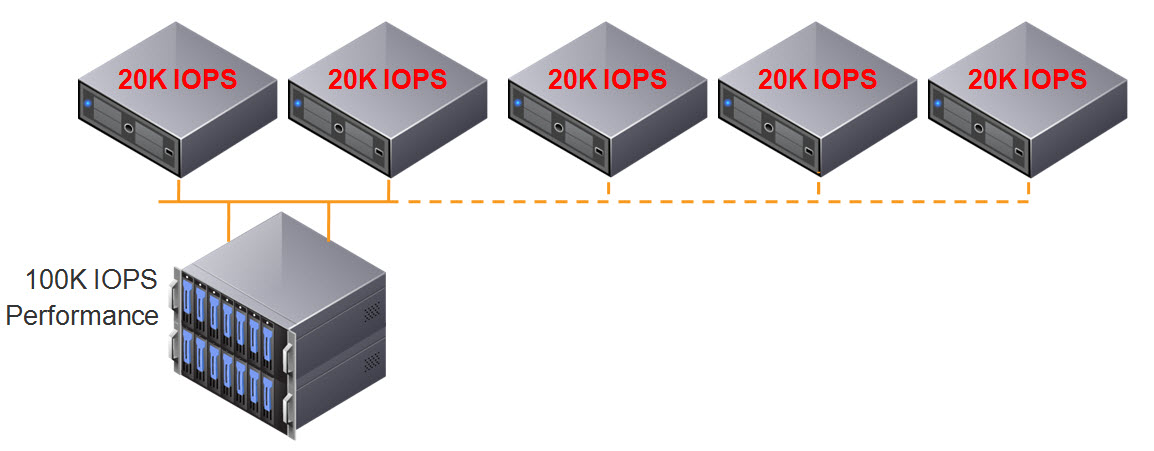
So lets add a disk shelf and see what happens.

20KIOPSAddDiskShelf

We still only have 100K IOPS capable storage controllers, so we don’t get any additional IOPS to our ESXi hosts, the result of adding the additional disk shelf is REDUCED performance per GB!

Make sure when your looking at implementing, upgrading or replacing your storage solution that it can actually scale both performance (IOPS/throughput) AND capacity in a linear fashion,otherwise your environment will to some extent be impacted by what I have explained above. The only ways to avoid the above is to oversize your storage day 1, but even if you do this, over time your environment will appear to become slower (and your CAPEX will be very high).

Also, consider the scaling increments, as a solutions ability to scale should not require you to replace controllers or disks, or have a maximum number of controllers in the cluster. it also should scale in both small, medium and large increments depending on the requirements of the customer.

This is why I believe scale out shared nothing architecture will be the architecture of the future and it has already been proven by the likes of Google, Facebook and Twitter, and now brought to market by Nutanix.

Traditional storage, no matter how intelligent does not scale linearly or granularly enough. This results in complexity in architecture of storage solutions for environments which grow over time and lead to customers spending more money up front when the investment may not be realised for 2-5 years.

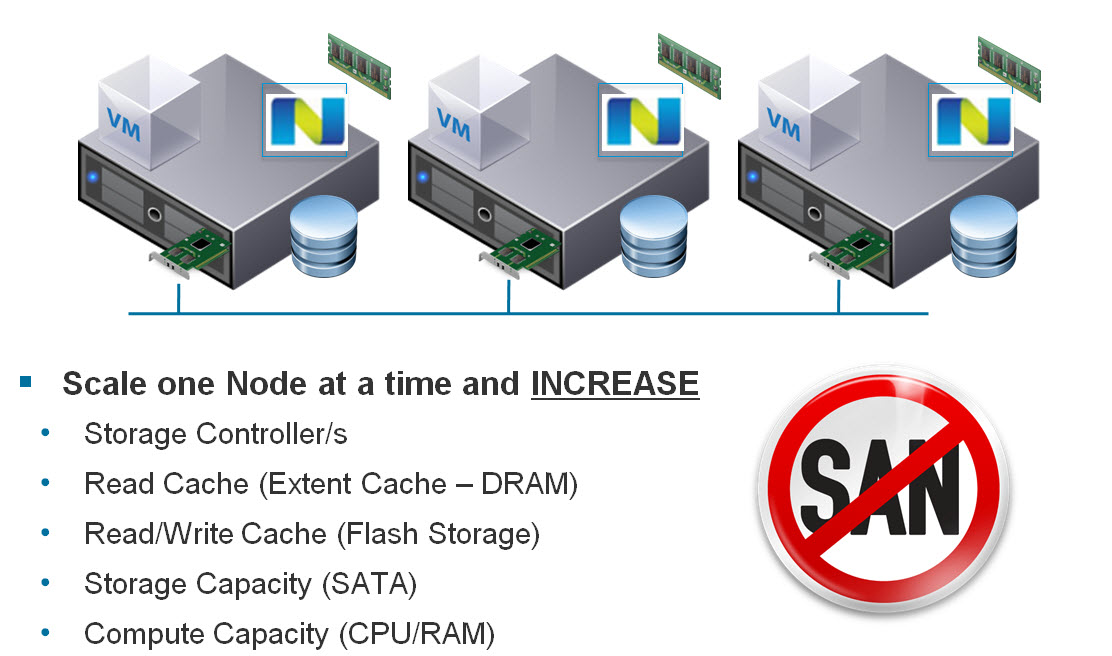
I’d prefer to be able to Start small with as little as 3 nodes, and scale one node at a time (regardless of node model ie: NX1000 , NX3000 , NX6000) to meet my customers requirements and never have to replace hardware just to get more performance or capacity.

Here is a summary of the Nutanix scaling capabilities, where you can scale Compute heavy, storage heavy or a mix of both as required.

ScaingSolution