Predictable & Scalable MS Exchange 2016 Performance on Nutanix with AHV

I’ve been doing some testing recently with Nutanix latest GA code (AOS 5.8) and I decided to do some quick MS Exchange Jetstress performance tests as part of a larger piece of work.

In short I wanted to check how well Exchange storage performance scaled so I performed three tests. I started with 4 threads, then increased to 8 and finally to 12 threads using Jetress with Exchange 2016 ESE database modules.

For this testing I disabled the Nutanix in memory read cache to ensure all read IO is serviced by the physical SSDs so the result is not artificially improved from cache.

I also disabled Compression, Erasure Coding and Deduplication as these also artificially improve performance due to Jetstress data being highly compressible & dedupable.

The hardware used was a NX-8150 with 6 x SSDs and Intel Broadwell processors. This is why the database size was only 1.7TB as that’s just below the total usable capacity of the node. The performance over larger database sizes remains the same when the metadata cache (in the Nutanix Controller VM) is sized for the desired working set size as shown by our ESRP certification.

The hypervisor is Acropolis Hypervisor (AHV) which is fully certified for Microsoft Windows under the MS SVVP programme as well as MS ESRP certified for MS Exchange.

So here is the result for 4 threads.

Jetstress2016_4Threads

5580 IOPS with just 4 threads is very good performance and is sufficient for at least five thousand mailboxes with hundreds of messages per day which is maximum recommended active users per Exchange MSR server.

The next question is: What’s the latency for the database reads and log writes? (These are two of the critical performance metrics for Jetstress Pass/Fail results)

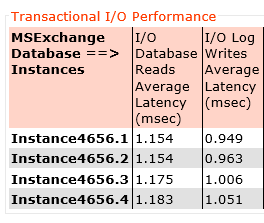
Jetstress2016_4Threads_Latency

Here we can see log write latency average across all four log drives is below 1ms (0.99ms) and database read latency at 1.16ms.

Next up, here is the result for 8 threads.

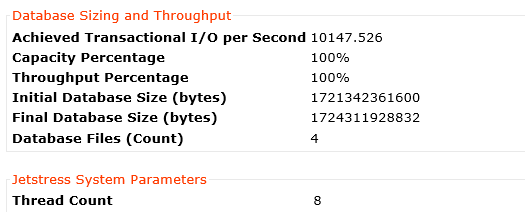
Jetstress2016_8Threads

10147 IOPS with 8 threads is excellent performance and shows Nutanix easily has headroom for more than ten-thousand mailboxes with hundreds of messages per day which easily exceeds the requirements for the maximum recommended active users per Exchange MSR server.

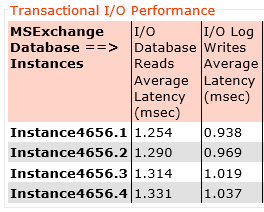
Again let’s check out the latency, Here we can see log write latency average across all four log drives is still below 1ms (0.99ms) and database read latency at 1.29ms. That’s just 0.13ms higher latency for reads and exactly the same write latency while achieving almost DOUBLE the IOPS.

Jetstress2016_8Threads_Latency

Lastly here is the result for 12 threads.

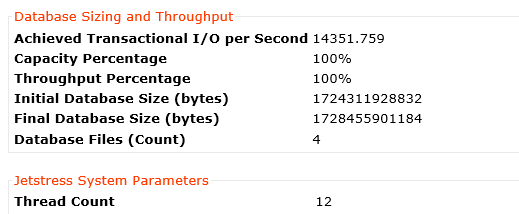
Jetstress2016_12Threads

14351 IOPS with 12 threads proves how scalable the Nutanix platform is as this is almost a linear increase in IOPS.

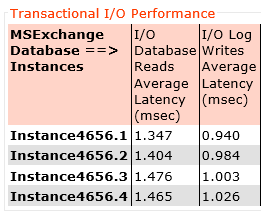
Again let’s check out the latency, Here we can see log write latency average across all four log drives is still below 1ms (0.98ms) and database read latency at 1.42ms. That’s just 0.14ms higher latency for reads and slightly lower write latency while achieving almost linear improvement in IOPS.

Jetstress2016_12Threads_Latency

Summary:

Nutanix provides extremely high, predictable performance for even the most demanding MS Exchange environments.


Nutanix gets Microsoft blessing for unique ESRP for a real world MS Exchange ESRP solution on All Flash

I am pleased to announce that Microsoft have approved Nutanix latest ESRP (Exchange Storage Review Program) submission for a 50,000 user deployment of MS Exchange on Nutanix NX-8150 all flash platform running the next generation hypervisor, AHV!

What’s unique about this you might ask?

  1. It’s the first hyper-converged (HCI) all flash ESRP solution (to compliment Nutanix existing Hybrid ESRP solutions for 24k users on Hyper-V and 30k users on AHV)
  2. The first multiple Exchange VM per node solution!!
  3. The first ESRP to provide MS Exchange Server role requirements calculator solution design
  4. The solution was performance tested/validated with N-1 nodes to simulate performance in the event a node had failed and was not replaced
  5. The solution supports the 1GB mailboxes without any assumed data reduction from compression, deduplication or Erasure Coding (EC-X)

The last point is key. Many vendors/solutions assume high data reduction ratios when sizing which adds risk to a project as I explained in Sizing infrastructure based on vendor Data Reduction assumptions. Nutanix (and me personally) rather give customers a guaranteed business outcome and while our data reduction is very effective especially for MS Exchange data, it can and does vary between customers. An ESRP should be a guaranteed outcome, and that’s what this unique ESRP from Nutanix delivers.

A major problem with many, if not most ESRP submissions is that they are not real world solutions, just storage platforms which can deliver high enough IOPS to potentially support a real world solution.

When designing the solution I planned to put forward for ESRP, I used an actual real world design for a Nutanix customer and ensures it was sized to be 100% real world.

For example, from a compute perspective the solution was sized with no CPU overcommitment and within the recommended maximum of 24 CPUs both of which ensure optimal CPU performance.

CPU sizing also ensures Exchange VMs fit within the NUMA node of the Nutanix node which ensures optimal memory performance, which is another key area to ensure optimal Exchange performance.

In addition, The VMs are sized to be under the Microsoft recommended CPU utilization threshold for a “Worst Failure Mode” of ≤ 80 percent.

From a real world perspective, MS Exchange is dependant on Active Directory. As a result the solution is also sized to support all the required Active Directory Global Catalog cores running on the same infrastructure.

From an availability and resiliency perspective, the solution is sized for N+1 at the infrastructure layer to compliment the N+1 at the MS Exchange DAG layer. This delivers customers a solution which has protection from multiple concurrent failures which is essential for Mission Critical applications.

In the real world, things change and having a solution which scales to support more users, more messages per day and greater mailbox capacity is essential.

The Nutanix NX-8150 All Flash ESRP discusses a scalable and repeatable model where the solution can be increased in size from supporting 1 GB mailboxes to >2 GB simply by choosing (configure to order) 3.84 TB drives vs. the 1.92 TB drives tested for this solution.

Another option is when the storage capacity is reaching a high threshold such as 80%+, customers can non disruptively add storage nodes to expand capacity. This can be done without any change at the OS or MS Exchange application layer and new capacity (and performance!) is available instantly.

Did you know Nutanix allows mixing all-flash & hybrid? This means the most active data (e.g.: Most recent email) is running in an all flash configuration and older mail is automatically and transparently migrated to the lower cost hybrid nodes.

From a storage performance perspective, the solution was tested with in-line compression enabled which is Nutanix official recommendation for MS Exchange as it provides excellent data reduction with no significant overheads.

Another focus are for Nutanix in the real world is reducing CAPEX and OPEX. A great example of this is the entire solution (excluding networking) uses just 10 rack units (RUs) per datacenter. While other vendors storage ESRPs will claim lower RU requirements, they excluding the physical servers required for the solution. Nutanix is advising the requirements for the compute and storage for the solution to be totally transparent.

This means the solution does not require a large investment in your datacenter or co-location and is cost effective to power and cool making the solution environmentally friendly as well.

From a performance perspective, the Nutanix solution was tested in an N-1 configuration to show the performance which can be achieved after the failure of a node within the cluster.

Even with a failed node, the solution achieves excellent performance with average database read and log write latency in the low 1ms range sustained for the 24 stress test required for ESRP submissions.

A few performance highlights:

  1. Nutanix achieved an average of 5172 IOPS per MS Exchange Jetstress instance with just 4 threads!
  2. Database read latency avg of just 1.05ms
  3. Log write latency avg of just 1.21ms
  4. Database backup performance of 215MB/sec per database which equates to more than 1.7GBps per node!

While the achieved performance vastly exceeds the requirements for Exchange, the key factor is the reduced CPU WAIT time achieved which results in much greater CPU efficiency than a physical Exchange server with JBOD storage. Meaning a virtualised exchange server on Nutanix (even hybrid systems) is more efficient than Microsoft Preferred architecture using physical servers and JBOD storage.

You may be asking yourself, why does this matter? The answer is simple. MS Exchange becomes inefficient when scaled up beyond 24 cores so the more efficient the usage of those cores, the more users, messages per day and better user experience can be achieved without scaling up or adding more servers.

So without further delay, I have provided the direct link to the document below for you convenience.

Nutanix ESRP – NX-8150-G5 All Flash 50,000 Users

ntnxallflashesrp

SQL & Exchange performance in a Virtual Machine

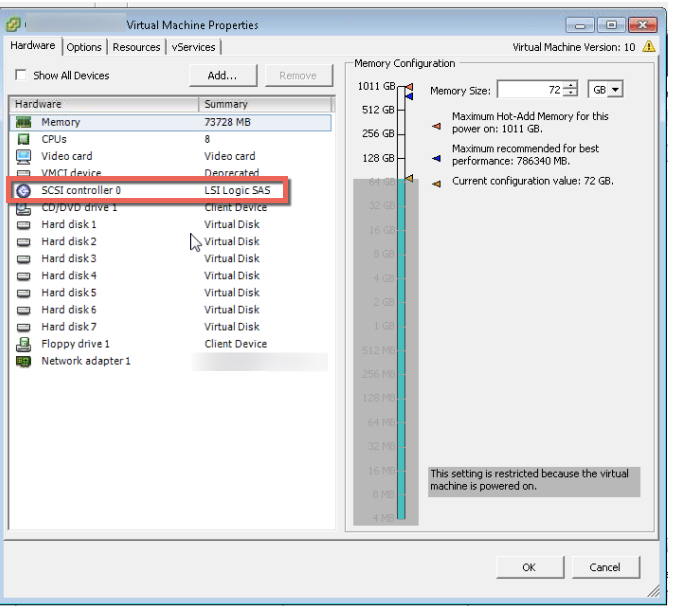
The below is something I see far to often: An SQL or Exchange virtual machine using a single LSI Logic SAS virtual SCSI controller.
LSIlogic

What is even worse is a virtual machine using a single LSI controller and a single virtual disk for one or more databases and logs (as shown above).

Why is this so common?

Probably because the LSI Logic SAS controller is the default for Windows 2008/2012 virtual machines and additional SCSI controllers are not automatically added until you have more than 16 virtual disks for a single VM.

Why is this a problem?

The LSI controller has a queue depth limit of 128, compared to the default limit for PVSCSI which is 256, however it can be tuned to 1024 for higher performance requirements.

As a result, the a configuration with a single LSI controller and/or a limited number of virtual disks can artificially significantly constrain the underlying storage from delivering the performance it is capable of.

Another problem with the LSI controller is the amount of CPU it uses is higher than the PVSCSI controller for the same IO levels. This means you’re wasting virtual machine (and the underlying hosts) CPU resources unnecessarily.

Using more CPU could lead to other problems such as CPU Ready which can also lead to reduced performance.

A colleague and friend of mine, Michael Webster wrote a great post titled: Performance Issues Due To Virtual SCSI Device Queue Depths where he shows the performance difference between SATA, LSI and PVSCSI controllers. I highly recommend having a read of this post.

What is the solution?

Using multiple Paravirtual (PVSCSI) adapters with virtual disks evenly spread over the four controllers for Windows virtual machines is a no brainer!

This results in:

  1. Higher default queue depth
  2. Lower CPU overheads
  3. Higher potential performance

How do I configure this?

It’s fairly straight forward, but don’t just change the LSI Controller too PVSCSI as the Guest OS may not have the driver installed which will result in the VM failing to boot.

Too avoid this, simply edit the virtual machine and add a new Virtual Disk of any size and for the virtual device node, select SCSI (1:0) and follow the prompts.
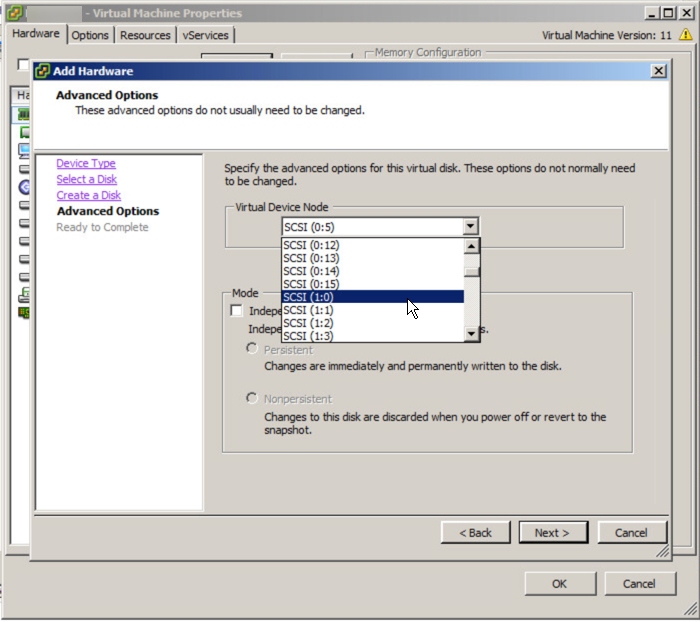
VirtualDiskSCSI10

Once the new virtual disk is added you should see a new LSI Logic SAS SCSI controller is added as shown below.
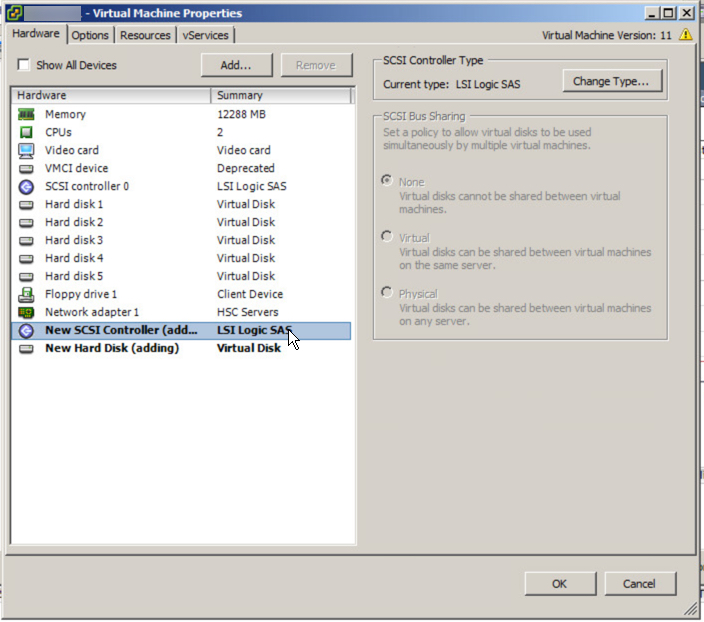
NewLSIController

Next highlight the adapter and select “Change Type” in the top right hand corner of the window and select Paravirtual. Once this is complete you should see similar to the below:
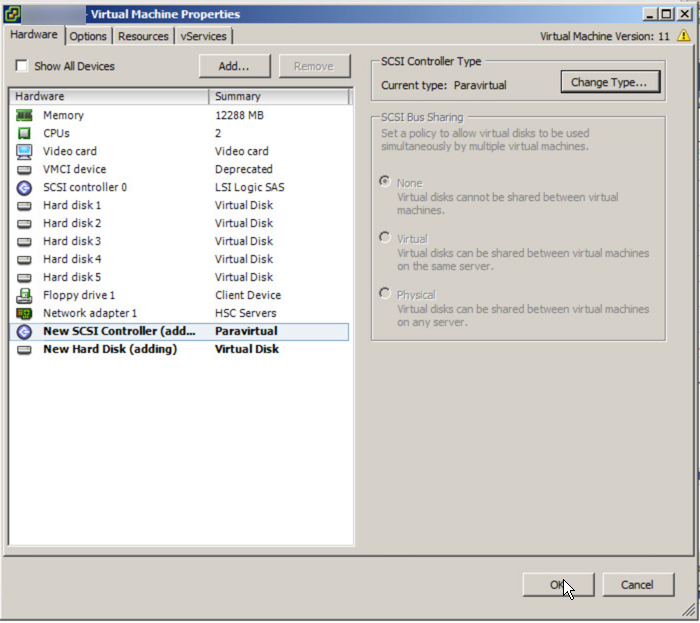
AddPVSCSIController

Next hit “Ok” and the new Controller and virtual disk will be added to the VM.

Now we open the console of the VM and open Compute Management and goto Device Manager. Under Storage Controllers you should now see VMware PVSCSI Controller as shown below.
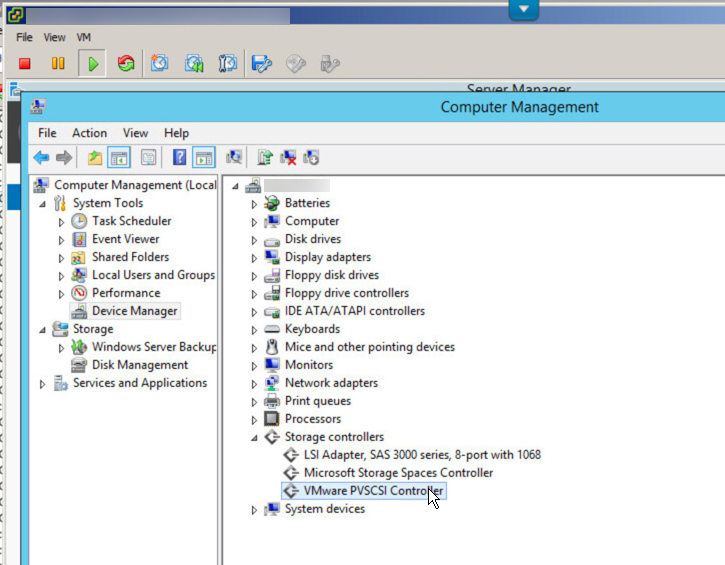
DeviceManagerPVSCSI

Now we are safe to Shutdown the VM.

Once the VM is shutdown, Edit the VM setting and highlight the SCSI Controller 0 and select Change Type as we did earlier and select Paravirtual. Once this is done you will see the original controller is replaced with a new controller.

ChangeLSItoPVSCSI

Now that we have the boot drive change to PVSCSI, we can now balance the data drives across up to four PVSCSI controllers for maximum performance.

To do this, simply highlight a Virtual Disk and drop down the Virtual Device Node and select SCSI (1:0) or any other available slot on the SCSI (1:x) controller.
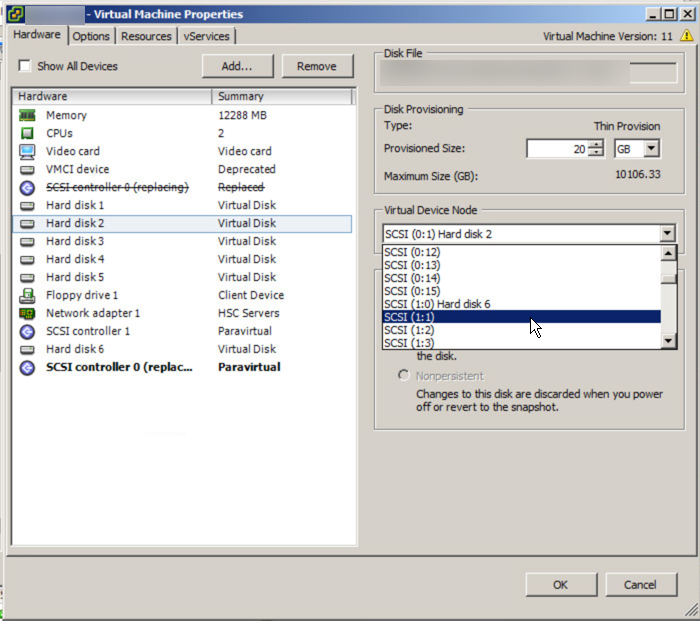
ChangeControllerID

After doing this you will see new SCSI controllers appear and you need to change these to Paravirtual as we have done to the first controller.
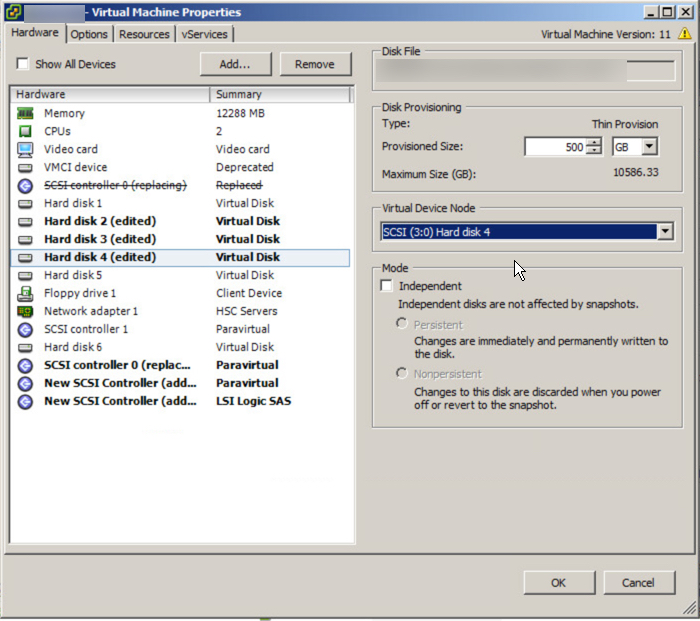
ChangeControllerIDMultipleVdisks

For each of the virtual disks, ensure they are placed evenly across the PVSCSI controllers. For example, if you have a VM with eight virtual disks plus the OS disk, it should look like this:

Virtual Disk 1 (OS) : SCSI (0:0)
Virtual Disk 2 (OS) : SCSI (0:1)
Virtual Disk 3 (OS) : SCSI (1:0)
Virtual Disk 4 (OS) : SCSI (1:1)
Virtual Disk 5 (OS) : SCSI (2:0)
Virtual Disk 6 (OS) : SCSI (2:1)
Virtual Disk 7 (OS) : SCSI (3:0)
Virtual Disk 8 (OS) : SCSI (3:1)
Virtual Disk 9 (OS) : SCSI (0:2)

This results in two data virtual disks per PVSCSI controller which evenly distributes IO across all controllers with the exception being first controller (SCSI 0) also hosting the OS drive.

What if I have problems?

On occasions I have seen problems with this process which has resulted in VMs not booting, however these issues are easy to fix.

If your VM fails to boot with a message like “Operating System not found”, I suggest you panic! Just kidding, this is typically just the boot order of the Virtual machine has been screwed up. Just go into the bios and check the boot order has the PVSCSI controller showing and the correct virtual disk in first priority.

If the VM boots and BSOD or crashes and goes into a continuous reboot loop then power off the VM and set the first SCSI controller where the boot disk is running back to LSI. Then reboot the VM and make sure the PVSCSI driver is showing up (if its not you didn’t follow the above instructions) so go back and follow them so the PVSCSI driver is loaded and working, then shutdown and change the SCSI controller back to PVSCSI and you should be fine.

If the VM boots and one or more drives do not show up in my computer, go into Disk Manager and you may see the drives are marked as offline. Simply right click the drive and mark it as online and reboot and you’re good to go.

Summary:

If you have made the intelligent move to virtualize your business critical applications, firstly congratulations! However as with physical hardware, Virtual machines also have optimal configurations so make sure you use PVSCSI controllers with multiple virtual disks and have your DBA span the database across multiple virtual disks for maximum performance.

The following post shows how to do this in detail:

Splitting SQL datafiles across multiple VMDKs for optimal VM performance

If the DBA is not confident doing this, you can also just add multiple virtual disks (connected via multiple PVSCSI controllers) and create a stripe in guest (via Disk Manager) and this will also give you the benefit of multiple vdisks.

Related Articles:

1. Peak Performance vs Real World Performance

2. Enterprise Architecture & Avoiding tunnel vision

3. Microsoft Exchange 2013/2016 Jetstress Performance Testing on Nutanix Acropolis Hypervisor (AHV)