Nutanix Resiliency – Part 7 – Read & Write I/O during Hypervisor upgrades

If you haven’t already review Parts 1 through 4, please do so as they cover critical resiliency factors around speed of recovery from failures, increasing resiliency on the fly by converting from RF2 to RF3 as well as using Erasure Coding (EC-X) to save capacity while providing the same resiliency level.

Parts 5 and 6 covered how Read and Write I/O function during CVM maintenance or failure and in this Part 7 of the series, we look at what impact hypervisor (ESXi, Hyper-V, XenServer and AHV) upgrades have on Read and Write I/O.

This post will refer to Parts 5 and 6 heavily so they are required reading to fully understand this post.

As covered in Part 5 and 6, no matter what the situation with the CVM, read and write I/O continues to be served and data remains in compliance with the configured Resiliency Factor.

In the event of a hypervisor upgrade, Virtual Machine are first migrated off the node and continue normal operations. In the event of a hypervisor failure the Virtual Machine would be restarted by HA and then resume normal operations.

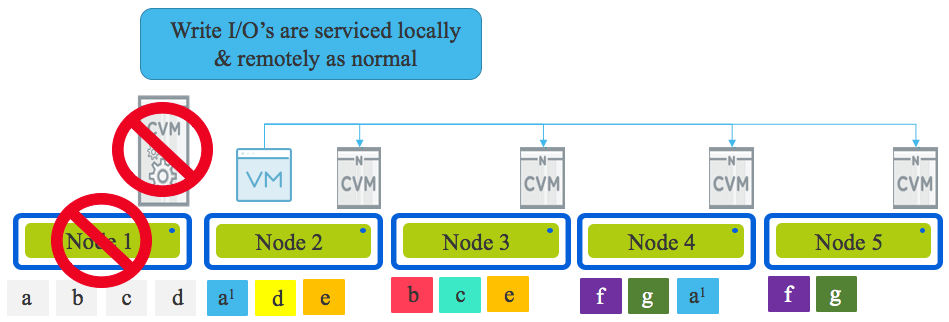
Whether it be a hypervisor (or node) failure or hypervisor upgrade, ultimately both scenarios result in the VM/s running on a new node and the original node (Node 1 in the diagram below) being offline with the data on it’s local drives unavailable for a period of time.

HostFailureHypervisorUpgradeWriteIO

Now how does Read I/O work in this scenario? The same way as was described in Part 5 with reads being serviced remotely OR if the 2nd replica happens to be on the node the Virtual Machine migrated (or was restarted by HA) onto, then the read is serviced locally. If a remote read occurs the 1MB extent is localised to ensure subsequent reads are local.

How about Write I/O? Again as per Part 6, all writes are always in compliance with the configured Resiliency Factor no matter if it’s a hypervisor upgrade OR CVM, Hypervisor, Node, Network, Disk or SSD failure with one replica being written to the local node and the subsequent one or two replica/s distributed throughout the cluster based on the clusters current performance and capacity per node.

It really is that simple, and this level of resiliency is achieved only thanks to the Acropolis Distributed Storage Fabric.

Summary:

  1. A hypervisor failure never impacts the write path of ADSF
  2. Data integrity is ALWAYS maintained even in the event of a hypervisor (node) failure
  3. A hypervisor upgrade is completed without disruption to the read/write path
  4. Reads continue to be served either locally or remotely regardless of upgrades, maintenance or failure
  5. During hypervisor failures, Data Locality is maintained with writes always keeping one copy locally where the VM resides for optimal read/write performance during upgrades/failure scenarios.

Index:
Part 1 – Node failure rebuild performance
Part 2 – Converting from RF2 to RF3
Part 3 – Node failure rebuild performance with RF3
Part 4 – Converting RF3 to Erasure Coding (EC-X)
Part 5 – Read I/O during CVM maintenance or failures
Part 6 – Write I/O during CVM maintenance or failures
Part 7 – Read & Write I/O during Hypervisor upgrades
Part 8 – Node failure rebuild performance with RF3 & Erasure Coding (EC-X)
Part 9 – Self healing
Part 10: Nutanix Resiliency – Part 10 – Disk Scrubbing / Checksums

Nutanix Resiliency – Part 6 – Write I/O during CVM maintenance or failures

In Part 5 we covered how Read I/O is serviced during CVM maintenance or failure so now we need to cover the arguably more difficult and critical task of servicing write I/O during the same maintenance or failure scenarios.

For those of you who read Part 5, this next section will look familiar. For those who have not read Part 5 I would ask that you please do so but let’s quickly cover off again the basics of how Nutanix ADSF writes and protects data.

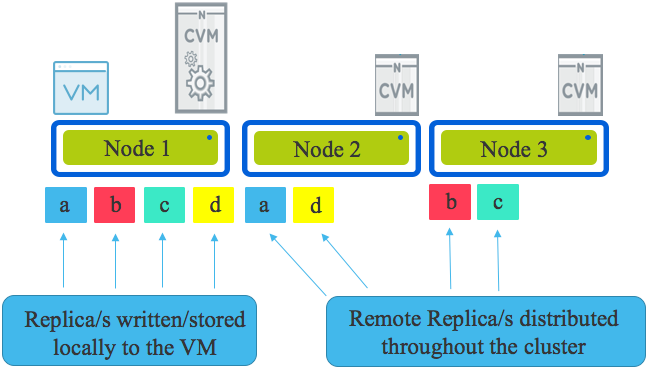
Looking an the following diagram we see a three node cluster with a single Virtual Machine. The VM has written some data represented by a,b,c & d & under normal circumstances all writes will have one replica written to the host running the VM (in this case Node 1) and the other replica (or replicas in the case of RF3) are distributed throughput the cluster based on disk fitness values. The disk fitness values (or what I call “Intelligent replica placement”) ensure data is placed in the most optimal place the first time based on capacity and performance.

RF2Overview

If one or more nodes are added to the cluster, the Intelligent replica placement will send proportionally more replicas to those nodes until the cluster is in a balanced state. In the very unlikely even no new writes are occurring, ADSF has a background disk balancing process which will balance the cluster as a low priority.

Now that we know the basics of how Nutanix protects data using multiple replicas (called “Resiliency Factor”) let’s talk about what happens during a Nutanix ADSF storage layer upgrade.

Upgrades are initiated by a one-click process and performed in rolling style one controller VM (CVM) at a time regardless of the configured Resiliency Factor and if Erasure Coding (EC-X) is used or not. The rolling upgrade put simply takes one CVM offline at a time, performs the upgrade, performs and self check and then rejoins the cluster and then repeats the process on the next CVM.

One of the many advantages of Nutanix decoupling the storage from the hypervisor (i.e.: not embedding storage into the kernel) is that upgrades and even storage layer failures do not impact the running Virtual machines.

VMs do not need to be restarted (i.e.: Like a HA event) nor do they need to migrate (e.g.: vMotion) to another node. VMs continue without interruption to storage traffic even when the local controller is offline for any reason.

If the local CVM is down for maintenance or due to failure, the write I/O is dynamically re-directed throughout the cluster.

Let’s look at a Write I/O when the CVM local to a VM is offline (for any reason).

The local CVM being offline means the physical drives (NVMe, SSD, HDD etc) are not available meaning the local data (replicas) is unavailable.

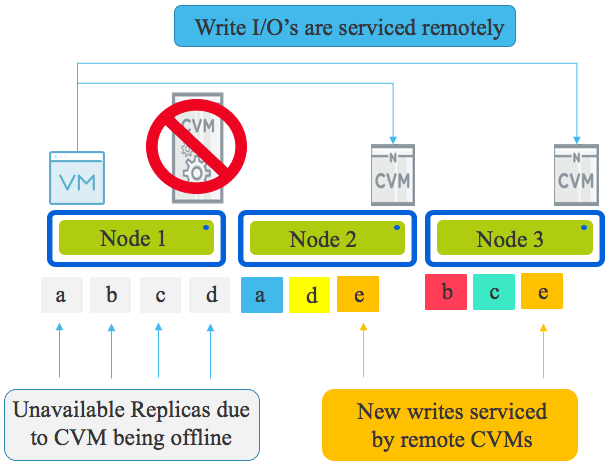
All write I/O will be continue to function and remain in compliance with the configured Resiliency Factor (RF), however rather than one replica being written locally, it will be written to a remote CVM over the network as will the other replica/s.

In the example below, we have a three node cluster so the VM on Node 1 is writing both replicas for “E” over the network to Node 2 and 3. This is how new data is serviced.

NewWriteIO

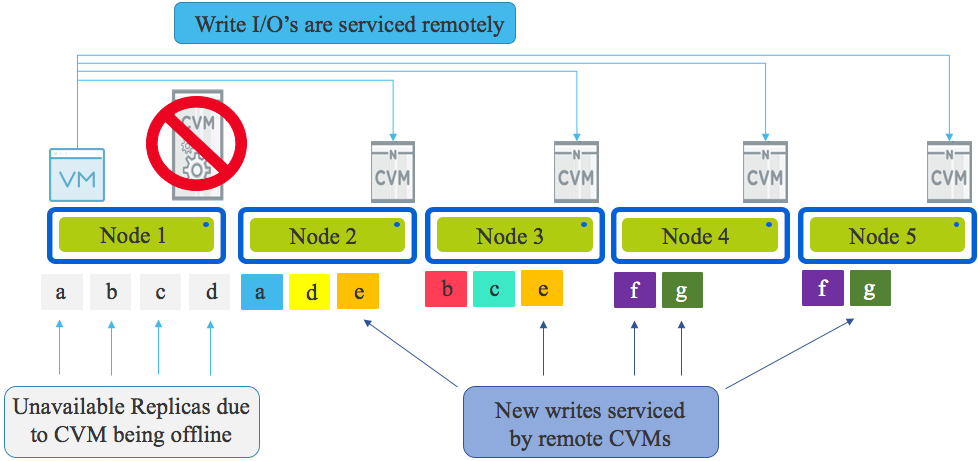
If more nodes existed in the cluster, the write traffic would be distributed evenly using Intelligent Replica Placement across all nodes within the cluster as shown below.

WriteIOLocalCVMDown5Nodes

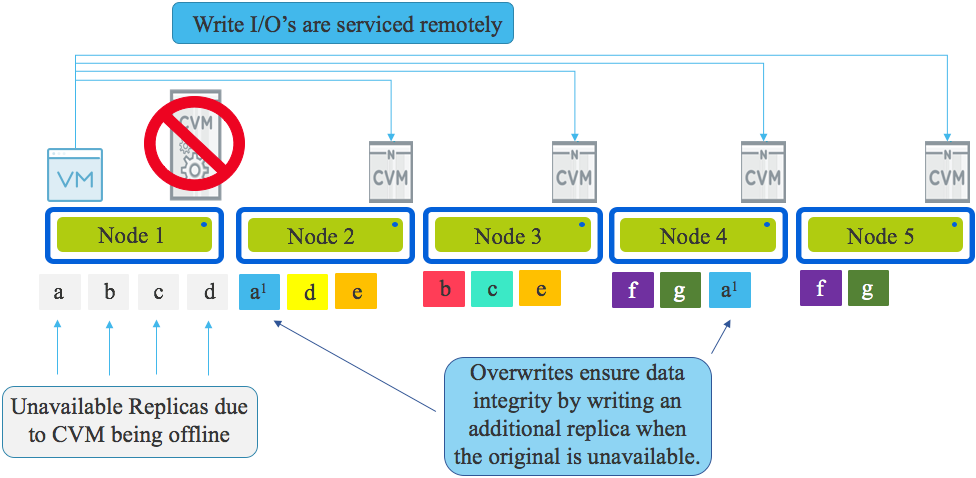
In the event data is being overwritten (as opposed to net new data) and the local replica is unavailable due to the CVM being offline, Nutanix ensures data integrity is maintained by overwriting the available replica and writing a second (or third for RF3) copy on another node in the cluster.

OverwriteWhenLocalCVMisDown

This is critical because if data is not always kept in compliance with it’s resiliency factor (FTT for VMware vSAN) a subsequent drive or node failure would cause data loss.

A major resiliency advantage Nutanix has over vSAN is the fact we always remain in compliance with the configured Resiliency Factor including during all failure and maintenance scenarios. vSAN however does not maintain it’s configured FTT level during all host maintenance and failure scenarios. For VMs on vSAN configured with FTT=1, in the event the host hosting one vSAN disk “object” is offline for maintenance, new overwrites are not protected so a single drive failure can result in data loss.

Chief Technologist at VMware, Duncan Epping recently posted an article titled: “VSAN 6.2 : Why going forward FTT=2 should be your new default”  where he recommended FTT=2 as the new default for vSAN customers.

I have to agree with Duncan, but I wouldn’t say vSAN should be set to FTT=2, I would say it MUST be set to FTT=2 as FTT=1 creates a single point of failure for over-writes during maintenance or failures and this is unacceptable for most production workloads with VDI being one of a potential few exceptions in some cases.

Nutanix on the other hand does not have the same architectural flaw as vSAN and as such, RF2 is extremely resilient and suitable for even the most critical environments as explained in this series.

That and the fact ADSF is able to restore resiliency in such a timely manner, RF2 has far superior resiliency compared to vSAN FTT=1.

In the next part we will cover the critically important topic of how VMs are impacted during hypervisor (ESXi, Hyper-V, XenServer and AHV) upgrades.

Summary:

  1. Write I/O continues uninterrupted if the local CVM is offline
  2. Write I/O is distributed throughout the cluster evenly thanks to Intelligent Replica Placement
  3. All new data is written in compliance with the configured Resiliency Factor
  4. Overwrites of existing data is always written in compliance with the configured Resiliency Factor by writing a new replica where the original replica is not available.
  5. Data integrity is ALWAYS maintained regardless of a CVM being under maintenance or failure.
  6. Nutanix RF2 is more resilient than vSAN FTT=1 despite each claiming to maintain two copies of data.

Index:
Part 1 – Node failure rebuild performance
Part 2 – Converting from RF2 to RF3
Part 3 – Node failure rebuild performance with RF3
Part 4 – Converting RF3 to Erasure Coding (EC-X)
Part 5 – Read I/O during CVM maintenance or failures
Part 6 – Write I/O during CVM maintenance or failures
Part 7 – Read & Write I/O during Hypervisor upgrades
Part 8 – Node failure rebuild performance with RF3 & Erasure Coding (EC-X)
Part 9 – Self healing
Part 10: Nutanix Resiliency – Part 10 – Disk Scrubbing / Checksums
Nutanix Resiliency – Part 3 – Node failure rebuild performance with RF3

In part 1 we discussed the ability of Nutanix AOS to rebuild Resiliency Factor 2 (RF2) from a node failure in a fast and efficient manner thanks to the Acropolis Distributed Storage Fabric (ADSF) while part 2 showed how a storage container can be converted from RF2 to RF3 to further improve resiliency and how fast the process completed.

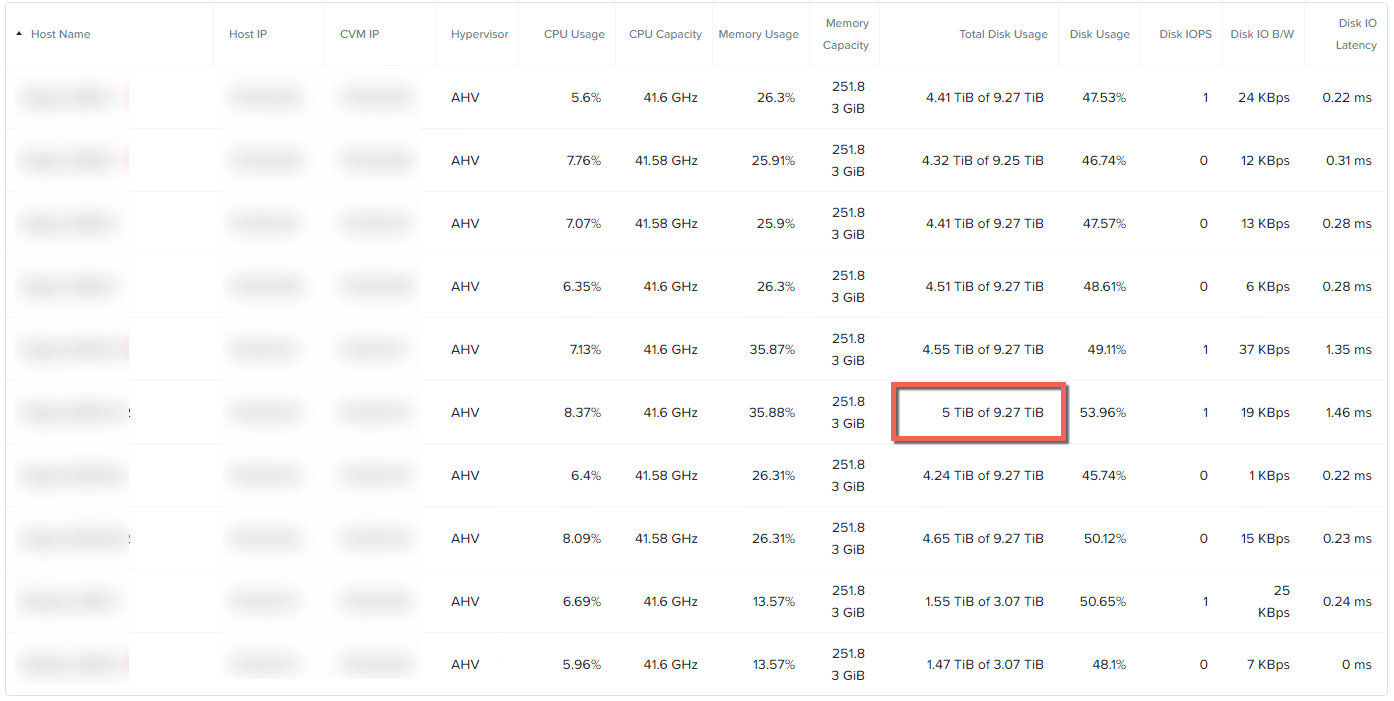
As with Part 2, we’re using a 12 node cluster and the breakdown of disk usage per node is as follows:

NodeCapacityUsage12NodeCLusterRF3

The node I’ll be simulating a failure on has 5TB of disk usage which is very similar to the capacity usage in the node failure testing in Part 1. It should be noted that as the cluster is now only 12 nodes, there are less controllers to read/write from/too as compared to Part 1.

Next I accessed the IPM Interface of the node and performed a “Power Off – Immediate” operation to simulate the node failure.

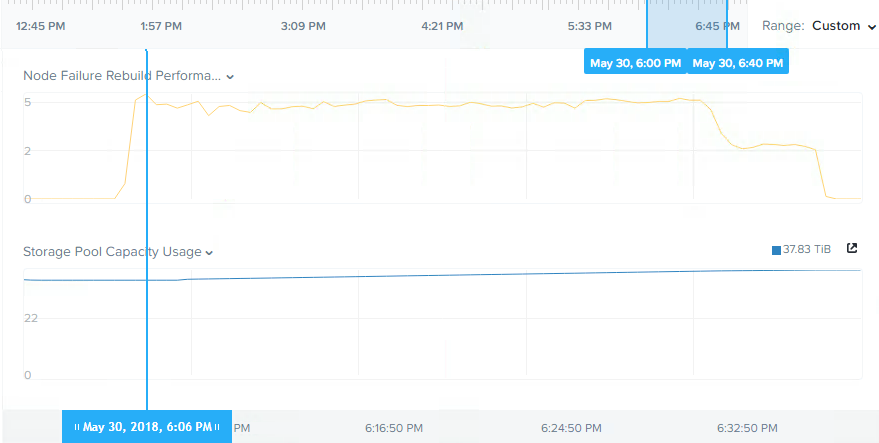
The following shows the storage pool throughput for the node rebuild which completed re-protecting the 5TB of data in approx 30mins.

RebuildPerformanceAndCapacityUsageRF3_12Nodes

Looking at the results at first glance, re-protecting in around 30 mins for 5TB of data, especially on 5yo hardware is pretty impressive, especially compared to SANs and other HCI products, but I felt it should have been faster so I did some investigation.

I found that the cluster was in an imbalanced state at the time I simulated the node failure and therefore not all nodes could contribute to the rebuild (from a read perspective) like they would under normal circumstances because they had little/no data on them.

The reason the cluster was in the un-balanced state is due to my having been performing frequent/repeated node failure simulations and I did not wait for disk balancing to complete after adding nodes back to the cluster before simulating the node failure.

Usually a vendor would not post sub-optimal performance results, but I strongly feel that transparency is key and while unlikely, it is possible to get in situations where a cluster is unbalanced and if a node failure occurred during this unlikely scenario it’s important to understand how that may impact resiliency.

So I ensured the cluster was in a balanced state and then re-ran the test and the result is shown below:

RF3NodeFailureTest4.5TBnode

We can now see over 6GBps throughput compared to around 5Gbps, an improvement of over 1GBps, and a duration of approx 12mins. We also can see there was no drop in throughput as we previously saw in the unbalanced environment. This is due to all nodes being able to participate for the duration of the rebuild as they all had an even amount of data.

Summary:

  • Nutanix RF3 is vastly more resilient than RAID6 (or N+2) style architectures
  • ADSF performs continual disk scrubbing to detect and resolve underlying issues before they can cause data integrity issues
  • Rebuilds from drive or node failures are an efficient distributed operation using all drives and nodes in a cluster
  • A recovery from a >4.5TB node failure (in this case, the equivalent of 6 concurrent SSD failures) around 12mins
  • Unbalanced clusters still perform rebuilds in a distributed manner and can recover from failures in a short period of time
  • Clusters running in a normal balanced configuration can recover from failures even faster thanks to the distributed storage fabric built in disk balancing, intelligent replica placement and even distribution of data.

Index:
Part 1 – Node failure rebuild performance
Part 2 – Converting from RF2 to RF3
Part 3 – Node failure rebuild performance with RF3
Part 4 – Converting RF3 to Erasure Coding (EC-X)
Part 5 – Read I/O during CVM maintenance or failures
Part 6 – Write I/O during CVM maintenance or failures
Part 7 – Read & Write I/O during Hypervisor upgrades
Part 8 – Node failure rebuild performance with RF3 & Erasure Coding (EC-X)
Part 9 – Self healing
Part 10: Nutanix Resiliency – Part 10 – Disk Scrubbing / Checksums