How to successfully Virtualize MS Exchange – Part 7 – Storage Options

When virtualizing Exchange, we not only have to consider the Compute (CPU/RAM) and Network, but also the storage to provide both the capacity and IOPS required.

However before considering IOPS and capacity, we need to decide how we will provide storage for Exchange as storage can be presented to a Virtual Machine in many ways.

This post will cover the different ways storage can be presented to ESXi and used for Exchange while subsequent posts will cover in detail each of the options discussed.

First lets discuss Local Storage.

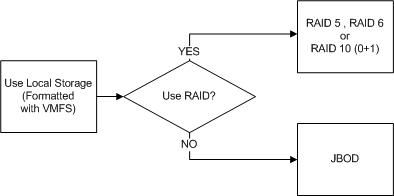
What I mean by Local Storage is SSD/HDDs within a physical ESXi hosts that is not shared (e.g.: Not accessible by other hosts).

This is probably the most basic form of storage we can present to ESXi and apart from the Hypervisor layer could be considered similar to a physical Exchange deployment.

UseLocalStorage

Next lets discuss Raw Device Mappings.

Raw Device Mappings or “RDMs” are where shared storage from a SAN is presented through the hypervisor to the guest as a native SCSI device and enables.

RDMs

For more information about Raw Device Mappings, see: About Raw Device Mappings

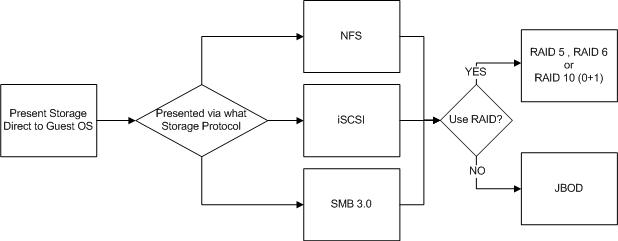
The next option is Presenting Storage direct to the Guest OS.

It is possible and sometime advantageous to presents SAN/NAS storage direct to the Guest OS via NFS , iSCSI or SMB 3.0 and bypasses the hyper-visor all together.

DirectInGuest

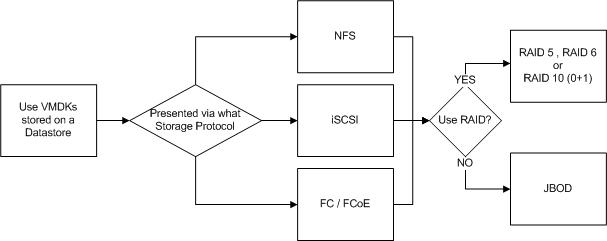
The final option we will discuss is “Datastores“.

Datastores are probably the most common way to present storage to ESXi. Datastores can be Block or File based, and presented via iSCSI , NFS or FCP (FC / FCoE) as of vSphere 5.5.

Datastores are basically just LUNs or NFS mounts. If the datastore is backed by a LUN, it will be formatted with Virtual Machine File System (VMFS) whereas NFS datastores are simply NFS 3 mounts with no formatting done by ESXi.

ViaDatastore

For more information about VMFS see: Virtual Machine File System Technical Overview.

What do all the above options have in common?

Local storage, RDMs, storage presented to the Guest OS directly and Datastores can all be protected by RAID or be JBOD deployments with no data protection at the storage layer.

Importantly, none of the four options on their own guarantee data protection or integrity, that is, prevent data loss or corruption. Protecting from data loss or corruption is a separate topic which I will cover in a non Exchange specific post.

So regardless of the way you present your storage to ESXi or the VM, how you ensure data protection and integrity needs to be considered.

In summary, there are four main ways (listed below) to present storage to ESXi which can be used for Exchange each with different considerations around Availability, Performance, Scalability, Cost , Complexity and support.

1. Local Storage (Part 8)
2. Raw Device Mappings  (Part 9)
3. Direct to the Guest OS (Part 10)
4. Datastores (Part 11)

In the next four parts, each of these storage options for MS Exchange will be discussed in detail.

Back to the Index of How to successfully Virtualize MS Exchange.

How to successfully Virtualize MS Exchange – Part 6 – vMotion

Having a virtualized Exchange server opens up the ability to perform vMotion and migrate the VM between ESXi hosts without downtime. This is a handy feature to enable hardware maintenance , upgrades or replacement with no downtime and importantly no loss of resiliency to the application.

In this article, I am talking only about vMotion, not Storage vMotion.

Lets first discuss vMotions requirements and configuration maximums.

vMotion requirements:

1. A VMKernel enabled for vMotion
2. A minimum of 1 x 1Gb NIC
3. Shared storage between source and destination ESXi hosts (recommended).

vMotion Configuration Maximums:

Concurrent vMotion operations per host (1Gb/s network):  4
Concurrent vMotion operations per host (10Gb/s network):  8
Concurrent vMotion operations per datastore: 128

As discussed in Part 4, I recommend using DRS “VM to Host” should rules to ensure DRS does not vMotion Exchange VMs unnecessary while keeping the cluster load balanced.

However, it is still important to design your environment to ensure Exchange VMs can vMotion as fast as possible and with the lowest impact during the syncing of the memory and during the final cutover.

So that brings us to our first main topic, Multi-NIC vMotion.

Multi-NIC vMotion:

Multi-NIC vMotion is a feature introduced in vSphere 5.0 which allows vMotion traffic to be sent concurrently down multiple physical NICs to increase available bandwidth and speed up vMotion activity. This effectively lowers the impact of vMotion and enables larger VMs with very high memory change rates do be vMotioned.

For those who are not familiar with the feature, it is described in depth in VMware KB : Multiple-NIC vMotion in vSphere 5 (2007467) as is the process to set it up on Virtual Standard Switches (VSS) and Virtual Distributed Switches (VDS).

From an Exchange perspective, the larger the MBX/MSR VM’s vRAM, and more importantly the more “active” the memory, the longer the vMotion can take. If vMotion detects the memory change rate is higher than the available bandwidth, the hypervisor will insert micro “stuns” to the VM’s CPU over time until the change rate is low enough to vMotion. This is generally has minimal impact to VMs, including Exchange, but if it can be avoided the better.

So using Multi-NIC vMotion helps as more bandwidth can be utilized which means vMotion activity is either faster, or can support more active memory with a low impact.

vMotion “Slot size”:

A vMotion slot size can be thought of as the compute and ram capacity required to perform a vMotion of a VM between two hosts. So for a VM with 96Gb of vRAM and the same memory reservation, the destination host requires 96Gb of physical RAM to be available to even qualify to begin a vMotion.

The larger the VM, the more of a factor this can become in the design of a vSphere cluster.

For example, The diagram below shows a four ESXi host HA cluster with several large VMs including several which are assigned 96Gb of vRAM as is common with Exchange MBX / MSR VMs.

In this scenario the Exchange VMs are represented by VM #13,15 and 16 and have 96Gb RAM ea.

ClustervMotionSlotSizeBad

The issue here is there is insufficient memory on any host to accommodate a vMotion of any of the Exchange VMs. This leads to complexity during maintenance periods as well as a HA event.

In fact in the above example, if an ESXi host crashed, HA would not be able to restart any of the Exchange VMs.

This goes back to the point I made in Part 5 about always ensuring an N+1 (minimum) configuration for the cluster, as this should in most cases avoid this issue.

In addition to the recommendation in Part 4 about using VM to Host DRS “should” rules to ensure only one Exchange VM runs per host.

Enhanced vMotion Compatibility:

Enhanced vMotion Compatibility or EVC, is used to ensure vMotion compatibility for all the hosts within a cluster. EVC ensures that all hosts in a cluster present the same CPU feature set to virtual machines, even if the actual CPUs on the hosts differ. The end result is configuring EVC prevents vMotion from failing because of incompatible CPUs.

The knowledge based article Enhanced vMotion Compatibility (EVC) processor support (1003212) from VMware explains the EVC modes and compatible CPU models. Note: EVC does not support Intel to AMD or vice versa.

Contrary to popular belief, EVC does not “slow down” the CPU, it only masks processor features that affect vMotion compatibility. The full speed of the processor is still utilized, the only potential performance degradation is where an application is specifically written to take advantage of masked CPU features, in which case that workload may have some performance loss. However this is not the case with MS Exchange and as a result, I recommend EVC always be enabled to ensure the cluster is future proofed and Exchange VMs can be migrated to newer HW seamlessly via vMotion.

For more details on why you should enable EVC, review the Example Architectural Decision – Enhanced vMotion Compatibility.

Jumbo Frames:

Using Jumbo frames helps improve vMotion throughput by reducing the number of packets and therefore interrupts required to migrate the same Exchange VM between two hosts.

Michael Webster @vcdxnz001 (VCDX #66) wrote the following great article showing the benefits of Jumbo Frames for vMotion is up to 19% in Multi-NIC vMotion environments: Jumbo Frames on vSphere 5

So we know there is a significant performance benefit, but what about the downsides of Jumbo Frames?

The following two Example architectural decisions covers the pros and cons of Jumbo Frames, along with justification for using and not using Jumbo for IP Storage. The same concepts are true for vMotion so I recommend you review both decisions and choose which one best suits your requirements/constraints.

Note: Neither decision is “right” or “wrong” but if your environment is configured correctly for Jumbo Frames, you will get better vMotion performance with Jumbo Frames.

  1. Jumbo Frames for IP Storage (Do not use Jumbo Frames)
  2. Jumbo Frames for IP Storage (Use Jumbo Frames)

vMotion Security:

vMotion traffic is unencrypted, as a result anyone with access to the network can sniff the traffic. To avoid this, vMotion traffic should be placed on a dedicated non route-able VLAN.

For more information see: Example Architectural Decision : Securing vMotion & Fault Tolerant Traffic in IaaS/Cloud Environments.

Note: This post is relevant to all environments, not just IaaS/Cloud/Multi-tenant.

Performing a vMotion or entering Maintenance Mode:

As per Part 4, I recommended using VM to Host DRS “should” rules to ensure only one Exchange VM runs per host. This also ensures only one Exchange VM is potentially impacted by vMotion when a host enters maintenance mode.

However, simply entering maintenance mode can kick off up to 8 concurrent vMotion activities when using 10Gb networking for vMotion. In this situation, the length of the vMotion for the Exchange VM will increase and potentially impact performance for a longer period.

As such, I recommend to manually vMotion the Exchange VM onto another host not running any other Exchange VMs (and ideally no other large vCPU/vRAM VMs) and waiting for this to complete before entering the host into maintenance mode.

The benefit of this will depend on the size of your Exchange VMs and the performance of your environment but this is an easy way to minimize the chance of performance issues.

DAG Failovers during vMotion?

This can occur as even a momentary drop of the network during vMotion, or the quiesce of the VM during the final stage of the vMotion exceeds the default Windows cluster heartbeat thresholds.

With vMotion setup correctly and ideally if using Multi-NIC vMotion, this should not occur, however there are ways to mitigate against this issue by increasing the cluster heartbeat time-out help prevent unnecessary DAG failovers.

To increase the cluster heartbeat timeout see: Tuning Failover Cluster Network Thresholds

Recommendations for vMotion:

1. Ensure vMotion is Active on 10Gb (or higher) adapters
2. Enable Multi-NIC vMotion across 2 x 10Gb adapters in environments with Exchange VMs larger than 64Gb RAM
3. Enable Enhanced vMotion Compatibility (EVC) to the highest supported level in your cluster
4. Use Jumbo Frames for vMotion Traffic
5. Ensure sufficient cluster capacity to migrate Exchange VMs
6. Use DRS rules to separate Exchange VMs to ensure vMotion is not prevented (as per Part 4)
7. When evacuating ESXi hosts running Exchange VMs, vMotion the Exchange VM first, and once it has succeeded, put the hosts into maintenance mode.
8. Use Network I/O Control (NIOC) to ensure a minimum level of bandwidth to vMotion (Further details in an upcoming post)
9. Do not Route vMotion Traffic
10. Put vMotion traffic on a dedicated non route-able VLAN (ie: No gateway)
11. Increase cluster heartbeat time-outs for Windows failover clustering with the maximums outlined in Tuning Failover Cluster Network Thresholds.

Back to the Index of How to successfully Virtualize MS Exchange.

How to successfully Virtualize MS Exchange – Part 5 – High Availability (HA)

HA has two main configuration options which can significantly impact the availability and consolidation of any vSphere environment but can have an even higher impact when talking about Business Critical Applications such as MS Exchange.

When considering MS Exchange MBX or MSR VMs can be very large in terms of vCPU and vRAM, understanding and choosing an appropriate setting is critical for the success of not only the MS Exchange deployment but any other VMs which are sharing the same HA cluster.

Let’s start with the “Admission Control Setting“.

Admission control can be configured in either “Enabled” or “Disabled” mode. “Enabled” means that if the Admission Control Policy (discussed later in this post) is going to be breached by powering on one or more VMs, the VM will not be permitted to power on, which guarantees a minimum level of performance for the running VMs.

If the setting is “Disabled” it means no matter what, VMs will be powered on. In this situation, it leads to the possibility of significant contention for compute resources which for MS Exchange MBX or MSR VMs would not be ideal.

As a result, it is my strong recommendation that the “Admission Control Setting” be set to “Enabled”.

Next lets discuss the “Admission Control Policy“.

There are three policies to choose from (shown below) each with their pros and cons.

AdmissionControlPolicies

1. Host failures the cluster tolerates

This option is the default and most conservative option. However it calculates the utilization of the cluster using what many describe as a very inefficient algorithm using what is called “slot sizes”.

A slot size is calculated as the largest VM from a vCPU perspective, AND the largest VM from a vRAM perspective and combines the two. Then the cluster will calculate how many “slots” the cluster can support.

The issue with this is for environments with a range of VM sizes, a small VM of 1vCPU and 1Gb RAM uses 1 slot, as would a VM with 8vCPU & 64Gb VM. This leads to the cluster having very low consolidation ratio and leads to unnecessary high numbers of ESXi hosts and underutilization.

As such, this is not recommended for environments with mixed VM sizes, such as MS Exchange MBX or MSR combined with VMs such as Domain Controllers.

2. Specify failover hosts

Specify failover hosts is a very easy setting to understand. You specify a failover host, and it does exactly that, acts as a failover host so if one host fails, all the VMs fail over onto the failover host.

Great, but the ESXi host then remains powered on doing nothing until such time there is a failure. So the fail-over HW provides no value during normal operations.

As such, this setting is not recommended.

3. Percentage of cluster resources reserved as failover spare capacity

This setting also is fairly easy to understand at a high level, although under the covers is more complicated and does not work how many people believe it does.

With that being said, it is a very efficient policy for environments with large VMs like Exchange MBX or MSR.

It avoids the inefficient “slot size” calculation, and works on virtual machines reservations to calculate cluster capacity.

For VMs with no reservation, 32Mhz and 0Mb ram (plus memory overhead) is used from vSphere 5.0 onwards. However for Exchange MBX/MSR VMs which as discussed in Part 3 should have Memory Reservations, HA will then use the full reserved memory to ensure sufficient cluster capacity for the Exchange VM to fail over without impacting memory performance. Now this is great news as we don’t want to overcommit memory for Exchange even in a failure scenario.

From a CPU perspective, 32Mhz will be the default reserved for any Exchange MBX or MSR VM which does not have a CPU reservation, so it makes sense from a HA perspective to use CPU reservations for Exchange VMs to ensure sufficient capacity exists within the cluster to tolerate an ESXi host failure.

CPU reservations will be discussed in more detail in a future post in this series.

As a result, I recommend using “Percentage of cluster resources reserved as failover spare capacity” for the admission control policy for Exchange environments.

Next we need to discuss what is the most suitable percentage to set for CPU and RAM.

The below table shows the required percentage for N+1 (Green) and N+2 (Blue) deployments based on the number of nodes in a vSphere HA cluster.

Table 1:

AdmissionControlPercetage

The above is generally what I recommend as N+2 provides excellent availability, including being able to tolerate a failure during maintenance or multiple host failures concurrently with little or no impact to performance after VMs restart.

So for clusters of sub 16 ESXi hosts, N+1 can be considered, but I recommended N+2 for greater than 16 ESXi host clusters.

The next table shows the required percentage for a cluster scaling from N+1 availability for up to 8 hosts, N+2 for up to 16 host, N+3 for up to 24 hosts and N+4 for the current maximum vSphere cluster of 32.

Table 2:

originalhapercetages

Its safe to say the above table is quite a conservative option (going up to N+4), however depending on business requirements these HA reservation values may be perfectly suited and are worth considering.

For more information see:
1. Example Architectural Decision – Admission Control Setting and Policy
2. Example Architectural Decision – VMware HA – Percentage of Cluster Resources Reserved for HA

Next lets discuss the “HA Virtual Machine Options“.

The below shows the “Cluster default settings” along with the “Virtual Machine settings” which allow you to override the cluster settings.

HAVMoptions

For the “VM restart priority”, I recommend leaving the “Cluster default setting” as “Medium” (Default).

For “Host Isolation Response” this heavily depends on your underlying storage and availability requirements, as such, I will address this setting in detail later in this series.

For the “VM Restart Priority” under “Virtual Machine Settings“, we have a number of options. If a DAG is being used, one option would be to Disable VM Restart and depend solely on the DAG for availability.

This has the advantage of reducing the compute requirements for the cluster to satisfy HA and gives the same level of availability as a DAG, which in many cases will meet the customers requirements.

Alternatively, the Exchange MBX or MSR VMs could be configured to “High” to ensure they are started asap following a failure, above less critical VMs such as Testing/Development.

Regarding “Datastore Heartbeating” and “VM Monitoring“, these will be discussed in future posts.

Recommendations for HA:

1. The “Admission Control Setting” be set to “Enabled”.
2. The “Admission control policy” to set to “Percentage of cluster resources reserved as failover spare capacity”
3. The “percentage of cluster resources reserved as failover spare capacity” be configured as per Table 1 (at a minimum).

Recommendations for HA Virtual Machine Options:

1. Do not disable HA restart for Exchange MBX or MSR VMs
2. Leave “HA restart priority” for Exchange MBX or MSR VMs to “Normal” for DAG deployments
3. Set “HA restart priority” for Exchange MBX or MSR VMs to “High” for non DAG deployments

Back to the Index of How to successfully Virtualize MS Exchange.